This is how to hatch Nerite snail eggs in an aquarium; place the eggs in brackish water (a mix of fresh and saltwater) until they hatch into small snails, and then transfer them back to freshwater in your aquarium once they reach a visible size.

Nerite snails are popular additions to freshwater aquariums thanks to their algae-eating habits and attractive shells. While they can’t reproduce in fresh water, nerite snails will readily lay eggs in aquarium environments.
With some setup and care, you can hatch the eggs and raise the baby snails, known as veligers. Hatching nerite eggs takes dedication but brings great rewards as you get to witness new life emerge.
This complete guide will walk you through everything you need to know to hatch nerite snail eggs at home.
An Introduction to Nerite Snails
Jump To
Nerite snails originate from marine environments but have adapted to live in freshwater habitats as well.
There are over 200 species, including popular aquarium varieties like zebra nerites, tiger nerites, and horned nerites. These busy algae-eaters constantly graze in aquariums and help keep plants clean.
While adult nerite snails thrive in freshwater tanks, they will only breed and lay viable eggs in brackish or saltwater.
However, female nerites regularly lay infertile eggs in freshwater aquariums that can be incubated to hatch into baby snails. Hatching these eggs takes some equipment and effort, but gives you a cost-effective way to raise new nerites.
Understanding Nerite Snails
Before hatching nerite eggs, it helps to understand some key traits and behaviors of these aquatic snails.
Nerite snails have rounded, spiral-shaped shells with shape and color varying among species. Adults range from 1/4 to 1/2 inches in size depending on the species. Nerites constantly graze on algae, keeping tanks clean.
These snails prefer water temperatures between 70°F and 82°F. They are non-aggressive and safe to keep with fish and shrimp. Nerites will not reproduce in freshwater, only laying infertile eggs.
Thanks to their personalities and habits, nerite snails offer many advantages for freshwater tanks.
They have unrivaled algae-eating ability, especially for hard-to-remove green spot algae. Their peaceful nature makes them ideal tankmates for community aquariums.
Nerites are hardy, low-maintenance snails once acclimated. They are visually interesting snails that crawl actively along surfaces. Nerites do not reproduce out of control like some other snail species can.
The Egg Laying Process
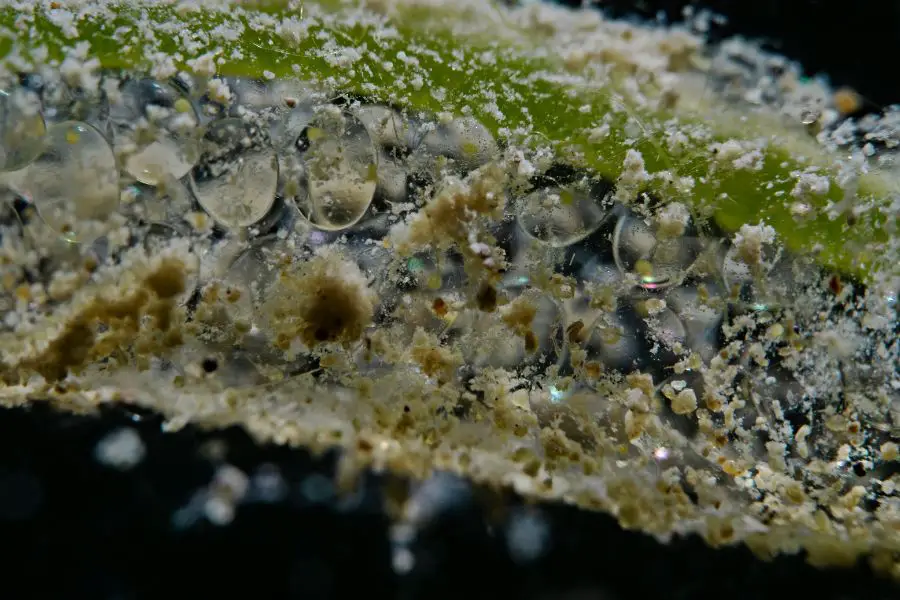
Female nerite snails follow a regular routine of laying eggs in aquarium environments. Nerites lay small, hard-shelled eggs about 1-2 mm across.
The eggs have a distinctive whitish, semitransparent appearance. Females deposit the eggs on smooth surfaces like tank walls, decor, and leaves. Nerite snails lay eggs continually, often in clutches of 20-30 at a time.
Nerite egg clutches are usually easy to identify, with some telltale signs. The eggs are located on flat surfaces the snail can adhere them to and arranged in neat, overlapping rows.
They have an oval shape and small size of 1-2 mm. The eggs are semi-transparent white, tan or yellowish in color, with a hard outer shell that has no give when touched.
The frequency and success of nerite egg laying depends on a few key factors. Water quality, including mineral levels and nutrients, impacts egg laying. Snails fed nutrient-rich foods lay more viable eggs.
Older snails lay fewer eggs over time. Females lay more eggs when a male is present. Stable, comfortable water parameters also spur egg laying.

Incubation Methods for Hatching Eggs
While nerite snail eggs laid in freshwater won’t hatch on their own, you can incubate the eggs to successfully hatch the baby snails. Many aquarists create simple, inexpensive DIY egg incubators using basic aquarium supplies.
Typical DIY incubation setups include a small plastic container or tupperware filled with brackish water, a sponge filter for gentle water circulation and oxygenation, an aquarium heater to keep water at 75-80°F, lighting on a timer to provide 8-10 hours of light daily, and brackish water mixed using aquarium salt to a specific gravity of 1.010 to 1.015.
For hobbyists looking for an all-in-one incubation system, there are now commercial nerite snail hatchery kits.
These kits include an acrylic or plastic hatching tank with built-in filtration, adjustable brackish water mixing sachets to simplify salinity control, a compact LED lamp designed for hatchery tanks, sponge media specially sized for hatching planktonic veliger larvae, and detailed instructions for setup and operation.
Temperature and Light Considerations
Two of the most critical factors for successfully hatching nerite eggs are maintaining proper temperatures and lighting.
Nerite eggs hatch fastest at temperatures of 75-82°F. Warmer temperatures around 80°F produce the highest hatch rates. Colder temps below 75°F slow development and reduce hatching success. Use an adjustable aquarium heater to keep the incubator at 75-80°F.
Bright lighting signals the eggs to hatch and fuels the growth of microscopic food. Provide 8-10 hours of light daily using an aquarium light or lamp over the hatchery. LED or full spectrum lights work well to deliver the right brightness and wavelengths. Maintain a consistent photoperiod by using a timer to control the lights.
Steps to Hatch Nerite Eggs
With the right setup and conditions, you can hatch infertile nerite snail eggs and successfully raise the veligers. Here is a step-by-step guide.
Look for clutches of eggs laid in the aquarium, typically on the glass. Use a clean razor to carefully remove the eggs, avoiding damaging the clusters. Only harvest eggs that are less than 2-3 days old for best viability.
Set up your chosen hatchery system and allow it to cycle for 1-2 weeks. Mix brackish water to a specific gravity of 1.010-1.015 using aquarium salt. Maintain water temp between 75-80°F and establish a photoperiod.
After the incubator has cycled, gently place the egg clutches inside using tweezers or a pipette. Secure the eggs to an object or surface for stability. Avoid overcrowding. Initiate your lighting schedule immediately after adding eggs.
Test salinity daily using a hydrometer or refractometer, adjusting as needed. Monitor water parameters like ammonia, nitrites, pH, and temperature. Perform partial water changes and filter maintenance to keep water clean.
Eggs will typically hatch within 14-21 days in optimal incubator conditions. Look closely at eggs to see embryos developing visibly inside shells. Hatched veligers look like tiny specks drifting in the water column.
Caring for the Hatchlings
The microscopic newborn nerites, called veligers, require special care to grow successfully. Veligers eat phytoplankton and microalgae, which will naturally grow in the hatchery. Supplement with infusoria and liquid fry foods to ensure healthy growth. Crushed flakes and pellets work once snails are large enough to accept them.
Keep salinity steady at 1.010-1.015, making frequent small adjustments as needed. Change 10-20% of water daily to remove waste products. Test for ammonia and nitrites often and correct levels immediately if elevated.
Leave lights on for 8-10 hours daily to spur algae and phytoplankton growth. If water becomes cloudy, cut back on feeding and adjust filtration to reduce organics. Transfer hatchlings to a rearing tank once they reach 1/8 inch in size.
Troubleshooting Challenges
Hatching nerite eggs is complex, and issues can arise. Many nerite eggs, especially from lone females, will be infertile and fail to hatch. Remove any eggs that show no sign of progress after 3-4 weeks. Try collecting newer eggs after introducing males to stimulate breeding.
Detritus buildup, low oxygen, or incorrect salinity can prevent hatching. Closely monitor parameters and make corrections to get conditions ideal. Look for spikes in ammonia or nitrites which require immediate attention.
Adult nerites will readily eat juvenile snails if housed together. Rear hatchlings in a separate tank or breeding box until they reach 1/4 inch size. Feed hatchlings frequently to discourage cannibalistic tendencies.
Conclusion
Hatching nerite snail eggs allows you to sustain a population of these popular algae eating snails. While not easy, the hatchery process is very feasible for hobbyists willing to put in research and effort.
Monitoring and adjusting incubation conditions gives you the best chances of raising healthy, growing veligers. With attention and care, you’ll have a thriving group of homebred nerites grazing in your aquarium.
Hatching nerite eggs is just the beginning. Consider researching other commonly bred species like mystery snails, rabbit snails, and trumpet snails. Joining snail breeding communities lets you learn from experienced breeders. Observing the development from egg to adult is an amazing experience that never gets old!
Few aquarists can resist the appeal of a tank full of active, healthy nerite snails. Hatching your own eggs allows you to fully control the snails’ genetics and quality. Plus, the fun of watching brand-new snails emerge, grow, and thrive is priceless.
When cared for properly, homebred nerites become treasured aquarium pets with their own unique shells and personalities. The hatchery process requires diligence, but the payoff is well worth it!
